OpenDaylight Controller
The Opendaylight-0.12.2 user manual can be found here:
https://docs.opendaylight.org/projects/netconf/en/stable-magnesium/user-guide.html
Installation
Before installing OpenDaylight, install required JAVA modules. OpenDaylight Magnesium requires a Java 11 environment. Any version other than Magnesium can work under Java 8 environment.
$ sudo apt-get -y install openjdk-8-jre
$ sudo apt-get -y install openjdk-11-jre
OpenDaylight can be downloaded from the link below.
https://docs.opendaylight.org/en/latest/downloads.html
Unzip the tar.gz file with this command:
$tar xvzf opendaylight.tar.gzTo start OpenDaylight, navigate to the OpenDaylight folder and run following command.
$./bin/karafBelow mentioned features are needed to be installed in the karaf shell of OpenDaylight.
feature:install odl-netconf-connector-all odl-netconf-topology odl-netconf-console odl-restconf odl-mdsal-apidocsConnecting with an OcNOS Device
To establish a connection between OpenDaylight and an OcNOS VM, below attached file will be used. Make sure to update host IP address and credentials in ocnos_connect.xml file depending on the NETCONF device.
Node-id for the connection can be of the user choice.
ocnos_connect.xml:
<node xmlns="urn:TBD:params:xml:ns:yang:network-topology">
<node-id>ocnos-3</node-id>
<host xmlns="urn:opendaylight:netconf-node-topology">x.x.x.x</host>
<port xmlns="urn:opendaylight:netconf-node-topology">830</port>
<username xmlns="urn:opendaylight:netconf-node-topology">ocnos</username>
<password xmlns="urn:opendaylight:netconf-node-topology">ocnos</password>
<tcp-only xmlns="urn:opendaylight:netconf-node-topology">false</tcp-only>
<keepalive-delay xmlns="urn:opendaylight:netconf-node-topology">10</keepalive-delay>
</node>
Use the following command to make connection. Make sure about the update of data in the ocnos_connect.xml file. “ocnos-3” in URL is node-id.
curl --user "admin":"admin" -H "Content-type: application/xml" -X PUT http://
localhost:8181/restconf/config/network-topology:network-topology/topology/topology-
/node/ocnos-3 -d '@ocnos_connect.xml'
After execution of the above command, check the connection status with the following command.
curl --user "admin":"admin" -H "Content-type: application/xml" -X GET http://
localhost:8181/restconf/operational/network-topology:network-topology/topology/topology-
netconf/ | jq .
The URL from the command can be used in a browser to access as well. ("username:password" = "admin:admin" if asked for sign-in when accessing URL.)
Results of above command:
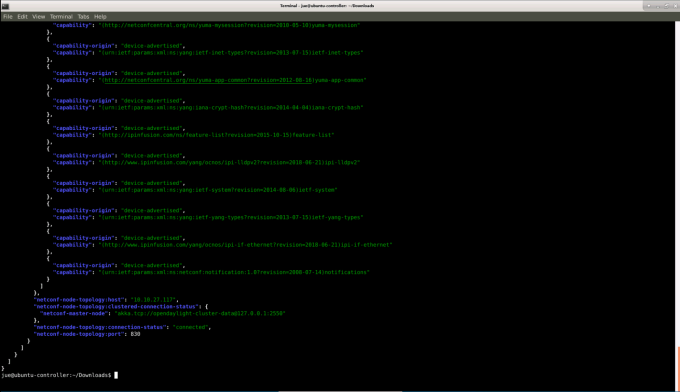
If the status shows 'connecting', it indicates capability exchange is still ongoing and it will soon move to 'connected'.
Restconf Endpoints
There are 2 different endpoints related to RestConf protocols:
| • | Draft-bierman-netconf-restconf-02, http://localhost:8181/restconf/… |
| • | RFC 8040, http://localhost:8181/rests/… |
For example:
GET http://localhost:8181/rests/data/network-topology:network-topology?content=config
for configuration datastore and GET http://localhost:8181/rests/data/network-topology:network-
topology?content=nonconfig for operational datastore.
Make sure to install all necessary features. If the odl-restconf feature is already installed, it provides both end points together.
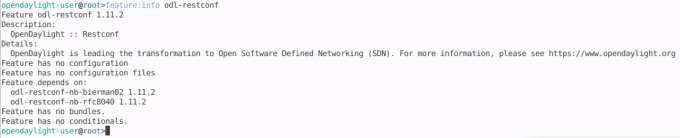
RFC 8040 can be installed independently:
$ feature:install odl-restconf-nb-rfc8040For connecting to OcNOS, the RFC 8040 Restconf endpoint needs to be used and installed. This has support for the 'PATCH' operation which translates to Netconf 'Merge'.
Patch or Merge Operation
In the case of RFC 8040, resources for configuration and operational datastores start /rests/data/.
For example:
| • | GET http://localhost:8181/rests/data/network-topology:network-topology with response of both datastores. It is allowed to use query parameters to distinguish between them. |
| • | GET http://localhost:8181/rests/data/network-topology:network-topology?content=config for configuration datastore |
| • | GET http://localhost:8181/rests/data/network-topology:network-topology?content=nonconfig for operational datastore. |
Also in the case of RFC 8040, if a data node in the path expression is a YANG leaf-list or list node, the path segment has to be constructed by having leaf-list or list node name, followed by an “=” character, then followed by the leaf-list or list value. Any reserved characters must be percent-encoded.
For example:
GET http://localhost:8181/rests/data/network-topology:network-topology/topology=topology-netconf?content=config
Retrieves data from configuration datastore for topology-netconf value of topology list is equivalent to the deprecated request.
A patch request can be used to modify an existing configuration. Currently, only yang-patch (RFC 8072) is supported. The URL would be the same as the above PUT examples.
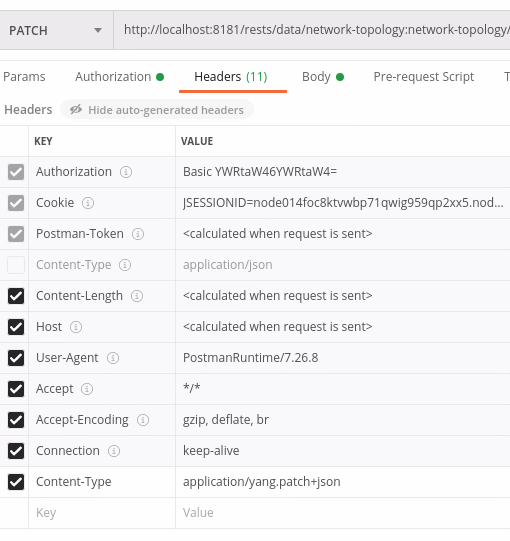
Using JSON for the body, the headers needed for the request would be:
Accept: application/yang.patch-status+json
content-Type: application/yang.patch+json
(Change the header-type for XML accordingly.)
JSON payload:
content-Type: application/yang.patch+json
{
  "ietf-restconf:yang-patch" : {
    "patch-id" : "0",
    "edit" : [
      {
        "edit-id" : "edit1",
        "operation" : "merge",
        "target" : "/",    //target value is the module to be configured
        "value" : {


         ### configuration goes here ###


        }
     }
    ]
  }
}
XML payload:
content-Type: application/yang.patch+xml
<yang-patch xmlns="urn:ietf:params:xml:ns:yang:ietf-restconf">
<patch-id>0</patch-id>
<edit>
<edit-id>edit1</edit-id>
<operation>merge</operation>
<target>/ </target> //target value is the module to be configured
<value>
### config goes here ###
</value>
</edit>
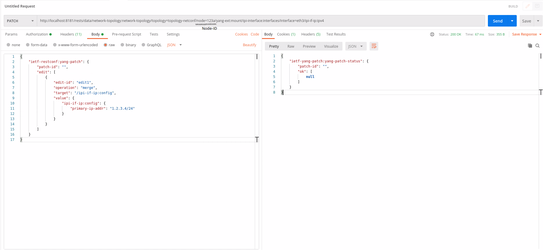
</yang-patch>This example shows a patch operation to edit ip-address for interface using ODL:
PATCH
@
http://localhost:8181/rests/data/network-topology:network-topology/topology=topology-
netconf/node=123a/yang-ext:mount/ipi-interface:interfaces/interface=eth3/ipi-if-ip:ipv4
JSON payload:
content-Type: application/yang.patch+json
{
    "ietf-restconf:yang-patch": {
        "patch-id": "",
        "edit": [
            {
                "edit-id": "edit1",
                "operation": "merge",
                "target": "/ipi-if-ip:config",
                "value": {
                    "ipi-if-ip:config": {
                        "primary-ip-addr": "x.x.x.x/24"
                    }
                }
            }
        ]
    }
}
XML payload:
content-Type: application/yang.patch+xml
<yang-patch xmlns="urn:ietf:params:xml:ns:yang:ietf-restconf">
    <patch-id>0</patch-id>
    <edit>
        <edit-id>edit1</edit-id>
        <operation>merge</operation>
        <target>/ipi-if-ip:config</target>
        <value>
            <config xmlns="http://www.ipinfusion.com/yang/ocnos/ipi-if-ip">
                <primary-ip-addr>x.x.x.x/24</primary-ip-addr>
            </config>
        </value>
    </edit>
</yang-patch>
Header for the action:
POSTMAN
Installation
$ sudo snap install postmanPostman app can be found under applications->Development->postman
For more details for downloading and installing POSTMAN desktop version:
https://gist.github.com/invinciblycool/ecc1c6e32b581b68932ac7452f4c911c
The POSTMAN desktop version should be running in the system while the web version is accessed at this link:
In the configuration of OpenDaylight in the POSTMAN tool, authentication should be set to basic authentication with username and password as 'admin' (as shown in the snippet above).
All the RESTCONF operations can be performed using POSTMAN tool.
Configuration using POSTMAN is shown later in the section "edit-config".

Edit-config
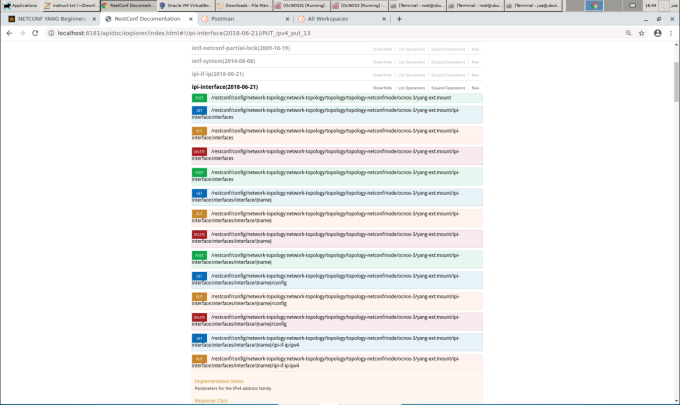
Edit-config using API-DOCS
Under the mounted resources of API-DOCS, all the APIs show the possible RESTCON operations which can be performed on the node. In the snippet below, different RESTCONF operations are displayed under ipi-interface API.
Edit-config using Terminal
$ curl -user "admin":"admin" -H "Content-type: application/xml" -X PUT http://
localhost:8181/restconf/config/network-topology:network-topology/topology/topology-
netconf/node/ocnos3/yang-ext:mount/ipi-interface:interfaces/interface/eth1/ipi-if-ip:ipv4 -d '@interface_config.xml'
The interface_config.xml file contents are:
interface_config.xml:
<ipv4 xmlns="https://www.ipinfusion.com/yang/ocnos/ipi-if-ip">
<config>
<primary-ip-addr>1.1.1.1/24</primary-ip-addr>
</config>
</ipv4>
Edit-config using POSTMAN
Similar to edit-config in NetConf, RESTCONF PUT method is sent by the client to create or replace the target data resource. RESTCONF PUT operation is shown in below attached snippet. Authentication should be selected as 'basic authentication' as shown before.
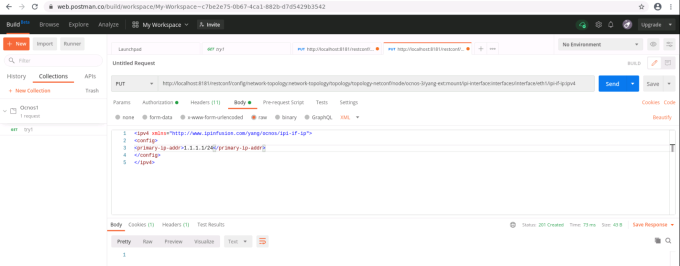
In the snippet above, the URL of interface eth1 of node-is = ocnos-3 is set to receive configuration file.
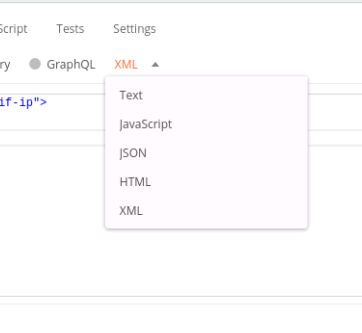
The body of the request contains the configuration data. POSTMAN supports different formats for data configuration as well.
As shown in the snippet above, after sending this request for the configuration, it returns a "201 created" http response. This means that target datastore has created the data resource as per the request.
Known Issues and Troubleshooting
Mounted resources on API-Doc showing 500:internal server error
ODL API-Doc requires additional patch to enable mounted resources. This is a known issue in ODL. To apply the patch/solution for ODL,
Replace yang-model-util-4.0.13.jar residing at:
opendaylight-0.12.2/system/org/opendaylight/yangtools/yang-model-util/4.0.13/ with the provided JAR file.
Contact IP Infusion Inc. support for the patch file.
To apply the PATCH using .JAR files
OpenDaylight shows certain parsing issues with IP Infusion Inc. generated yang modules. This in turn affects OpenDaylight functions. It can be avoided by changing certain .JAR files in ODL system.
If you have revised JAR file, these revised .JAR files will replace OpenDaylight source JAR files.
To enable the change of the PATCH, OpenDaylight features are needed to be installed again. That can be achieved by:
| 1. | Delete the OpenDaylight/data directory. |
| 2. | Replace provided .JAR files with current OpenDaylight/system .jar files. |
| 3. | Re-run after clearing OpenDaylight/data, this ODL will have no "data" and will be affected with the PATCH. |
| 4. | Re-install all necessary karaf features. |
Unavailable-capabilities in hello message
After connecting with netconf device, it advertises all its yang capabilities in its hello message with ODL.
If OpenDaylight shows unavailable capabilities, please try to delete all yang files residing at:
opendaylight-0.12.2/cache/schema/and attempt to re-connect with netconf-device.
JAVA_HOME not set
If the JAVA_HOME not set error appears when executing the $./bin/karaf command, it can be solved by setting JAVA_HOME to the directory of the local JDK.
To perform that operation, you need to provide local directory address to JAVA_HOME.
To check where the Java binary resides:
$ sudo update-alternatives --config java There is only one alternative in link group java (providing /usr/bin/java):
/usr/lib/jvm/java-8-openjdk-amd64/jre/bin/javaNothing to configure.
In our case, the binary for Java 8 resides at:
/usr/lib/jvm/java-8-openjdk-amd/jre/bin/javaWith the path known, apply this command to update BASHRC file:
$ echo 'export JAVA_HOME=/usr/lib/jvm/java-8-openjdk-amd64/jre' >> ~/.bashrc(Make sure that JAVA_HOME ends with /jre.)
OcNOS devices with different product versions cannot connect simultaneously
OcNOS devices with different product versions (such as SP, DC, or RON) cannot be connected simultaneously with the same ODL host machine.
To connect a device with a different OcNOS product version (when it was previously connected with another version), you need to clean the ODL schema cache.
OcNOS devices with different release versions of the same product can connect simultaneously to the same ODL host machine.